CD-Drive 3D Printer
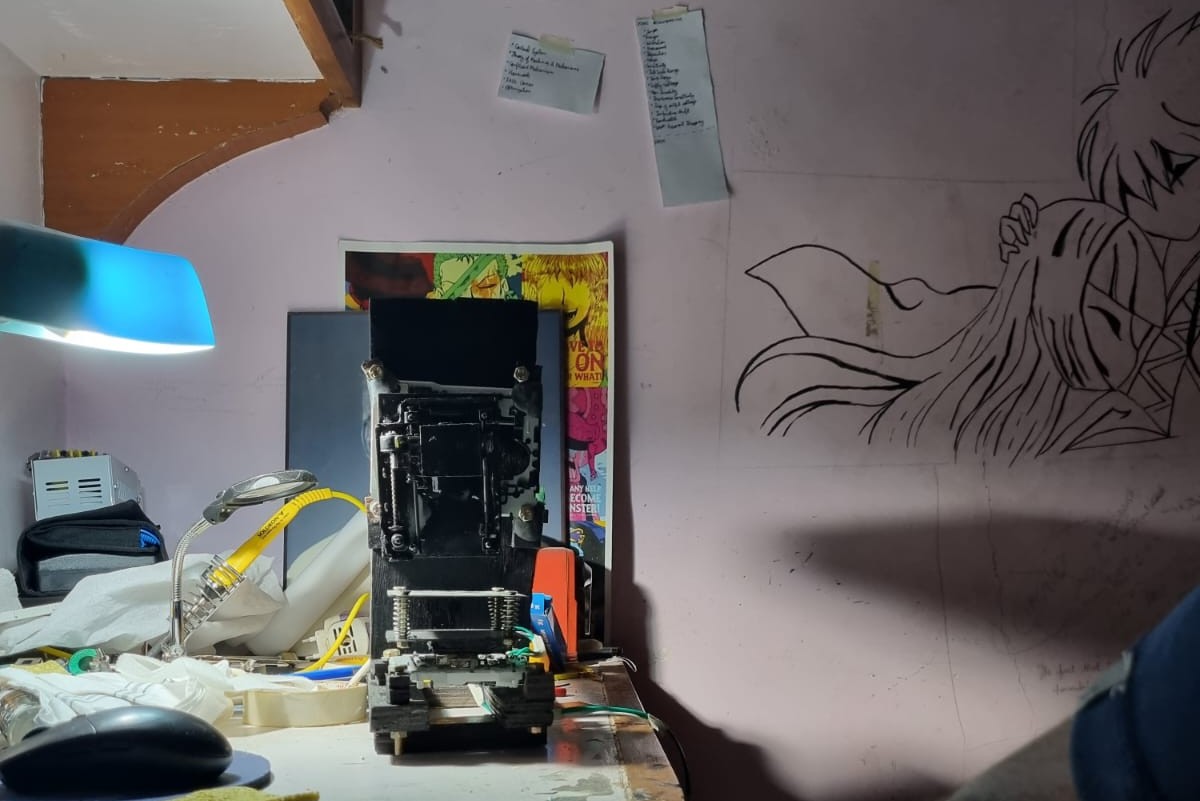
What I did
- Pulled linear-motion mechanisms out of recycled CD/DVD drives and built a laser-cut plywood frame
- Wired the RAMPS 1.4 controller, stepper drivers, thermistor and hotend
- Configured and calibrated Marlin firmware, and tried Klipper, all for about $30
Curious about what makes 3D printers tick, I decided to build one from scratch using recycled CD/DVD drives as the motion system. Inspired by Anhad Sawhney's DVD drive printer design, I sourced old optical drives from e-waste, extracted their precise lead screw mechanisms, and designed a laser-cut plywood frame to hold everything together.
The electronics side used a RAMPS 1.4 shield with A4988 stepper drivers, and I integrated an E3D-style hotend with proper cooling. The real learning came from firmware configuration, I spent significant time understanding Marlin's architecture, calibrating steps/mm for the tiny CD drive lead screws, and later explored Klipper for its more modern approach.
While this ~40mm build volume printer didn't achieve successful prints, that wasn't really the point. The project gave me hands-on understanding of Cartesian kinematics, stepper motor control, PID tuning, and firmware internals, skills I now apply when working with research-grade printers and CNC systems.
Problem Statement
- Goal: Learn how consumer 3D printers work by building one from scratch using recycled components
- Constraints: Limited budget (~$30), use recycled CD/DVD drives for motion system, compact form factor
- Focus: Skill-building exercise centered on mechanical design, motion control, electronics wiring, and firmware configuration rather than achieving production-grade print quality
Methodology
The project followed a learn-by-building workflow: source components, design the frame, assemble the motion system, wire the electronics, and configure firmware.
Design & Build
Component Sourcing & Teardown
Sourced three CD/DVD drives from old computers and e-waste. Carefully disassembled each drive to extract the linear motion mechanisms, these use precise lead screws with stepper motors that provide surprisingly accurate positioning despite their original purpose of moving a laser head.
Frame Design & Fabrication
Designed a compact frame using laser-cut plywood to mount the three CD drive mechanisms in a Cartesian configuration (X, Y, Z axes). Created custom mounting brackets to securely hold the drives while allowing adjustment for alignment.
Hotend & Extruder Mounting
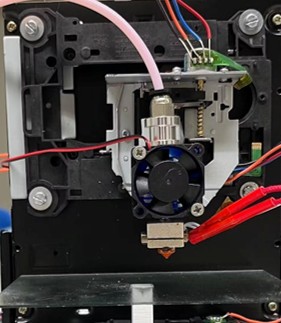
Mounted an E3D-style hotend onto the X-axis CD drive carriage. Added a 30mm cooling fan for the cold end and integrated the heater block. This was the most mechanically challenging part, ensuring the hotend was rigid while the tiny carriage could still move freely.
Electronics & Firmware
Electronics Integration
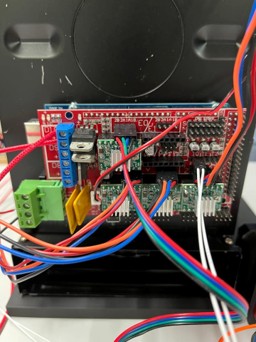
Wired a RAMPS 1.4 shield (on Arduino Mega) with A4988 stepper drivers for motor control. Connected thermistor for temperature sensing, heated nozzle, and cooling fan. Routed all cabling for clean wire management and accessibility.
Firmware Configuration
Configured Marlin firmware for the unconventional hardware. Key challenge was calibrating steps/mm for the CD drive lead screws (much finer pitch than typical 3D printer lead screws). Also explored Klipper firmware to understand its architecture and advantages for future builds.
Results
This was a learning project focused on skill development rather than print quality metrics. Powered on system, achieved motor movement, and configured firmware parameters.
Outcomes Key findings & learnings
- Assembled complete 3D printer motion system from recycled CD drives
- Achieved full electronics integration with RAMPS 1.4 at ~$30 total component cost
- Gained working knowledge of Marlin firmware architecture and configuration
- Learned Klipper firmware fundamentals as modern alternative
- Understood practical limitations of CD drive mechanisms (limited travel ~40mm, low torque)
Future Future scope
- Attempt first successful test prints with fine-tuned calibration
- Upgrade to TMC2209 silent stepper drivers
- Design 3D-printed structural parts to replace plywood frame
- Add heated bed for better adhesion
- Implement Klipper firmware for faster processing
Skills Technical skills demonstrated
- Primary: 3D Printer Mechanics, Marlin Firmware, Klipper Firmware, RAMPS 1.4 Electronics
- Secondary: Stepper Motor Control, Laser Cutting, E-Waste Recycling/Upcycling, PID Tuning, G-Code Fundamentals
- Tools: Arduino IDE, Soldering Iron, Multimeter, Laser Cutter
Why It Never Printed
It never printed because the CD drives died early. I'll try again, and the project got me properly into 3D printing: I've since modded an Ender 3 S1 Pro.
Additional Information
Inspiration and acknowledgements for this project.
Inspiration Project origin
This project was inspired by Anhad Sawhney's DVD Drive 3D Printer design concept.
The overall design concept was adapted from this open-source project. Used open-source RAMPS 1.4 electronics platform and Marlin firmware base.
Notes Project context
This was a learning project: a skill-building exercise, not a production machine.
No demo video is available for this project.
No successful prints were achieved, but the focus was on understanding the full printer development stack from frame construction to firmware setup.